

It is good practice to check your mixes on a variety of playback systems to see how your mixes will translate. Using an impulse file and some creative use of the Cubase and Nuendo Control Room functionality, you can create a monitor path which simulates your mix through an Auratone speaker.
Download the impulse response files – Auratone 44.1kHz | Auratone 48kHz
Special thanks to Simon Weir from TVNZ for the Auratone impulse sample.
Here’s how you do it!
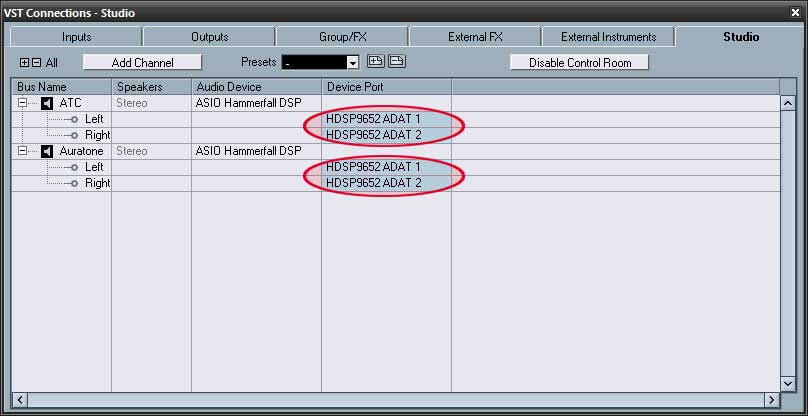
(1) Open your “VST Connections” window (F4) and making sure your Control Room is enabled, go to the “Studio” tab. In here we will create 2 monitors paths which are both assigned to the same physical outputs on our sound device.
VST Connections
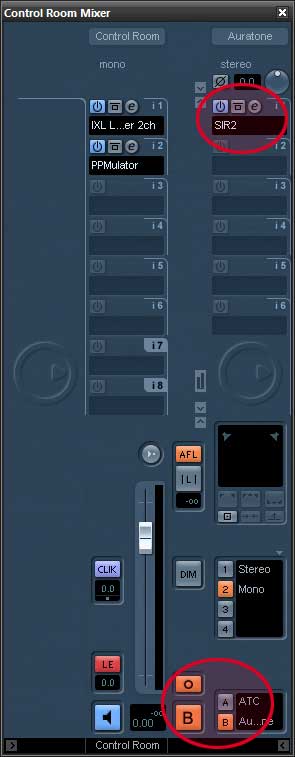
(2) Open your Control Room mixer and make sure you have expanded the view to show inserts for your monitor paths. Using the A/B button, switch to your 2nd monitor path (B) and insert a convolution reverb processor on one of the inserts. Load the Auratone impulse into the convolution processor and set the wet/dry mix to 100% wet. Also switch the down-mix preset to “mono” for this monitor path.
That’s it! Now you can switch between A/B monitor paths. Path A will be your clean sounding mix and Path B will be a mono mix which sounds as though it is coming through an Auratone.
Monitor Path A

Monitor Path B
There are many convolution processors available (both commercial and freeware), however I recommend one which has 0 processing latency so this technique doesn’t add to the overall latency on your system.
Waves IR-1 – https://www.waves.com/
Altiverb – https://www.audioease.com/
Voxengo Pristine Space – https://www.voxengo.com/


